| Tutorials Home | Next | |
|---|---|---|
Compiling and Installing libpointmatcher on Windows
Compiling using MSVC (Microsoft Visual Studio)
In Short...
If you are used to development project, here is what you need:
| Name | Link | Version (Tested December 29, 2018) |
|---|---|---|
| Windows | 10 | |
| git | https://git-scm.com/ | v2.20.1 |
| libpointmatcher sources | https://github.com/ethz-asl/libpointmatcher | |
| libnabo sources | https://github.com/ethz-asl/libnabo | |
| Visual Studio | https://visualstudio.microsoft.com/ | Visual Studio 2017 15.9.4 |
| CMake | https://cmake.org/ | v3.13.2 |
| Eigen 3 | http://eigen.tuxfamily.org/index.php | v3.3.7 |
| Boost | https://www.boost.org/ | v1.69.0 |
The rest of this tutorial will guide you through the different requirements step by step.
Building Boost
- Open a console that knows the path to the MSVC compiler command (cl). We suggest using Windows PowerShell. An alternative is Developer Command Prompt, which can be located in the Start menu in the Visual Studio section.
-
Go to your Boost source directory, and do:
$ .\bootstrap.bat $ .\b2.exe install --prefix=build address-model=64 -
It may take a while to finish.
Build libnabo
You may need to install grep to build libnabo. You can get the Windows version here.
-
Start CMake GUI
-
Add the path of your libnabo source folder in the field Where is the source code.
- Add a folder named build in the field Where to build the binary. This will allow you to do out-of-source compilation.
-
Click on the button Configure
- Select the generator for the project (Visual Studio 15 2017 Win64)
- Typically you will select "Use default native compilers" for the generator
- Click "Finish"
- An error will be reported, because CMake does not know yet where to find the libraries. The next steps will tell it where to find them.
-
Locate your eigen folder in the field EIGEN_INCLUDE_DIR
-
Add the following boolean variable and set it to
true: Boost_USE_STATIC_LIBS -
Add the following PATH variable and set it to (your boost folder)/build: BOOST_ROOT
-
Change the variable CMAKE_CONFIGURATION_TYPES to
RelWithDebInfo -
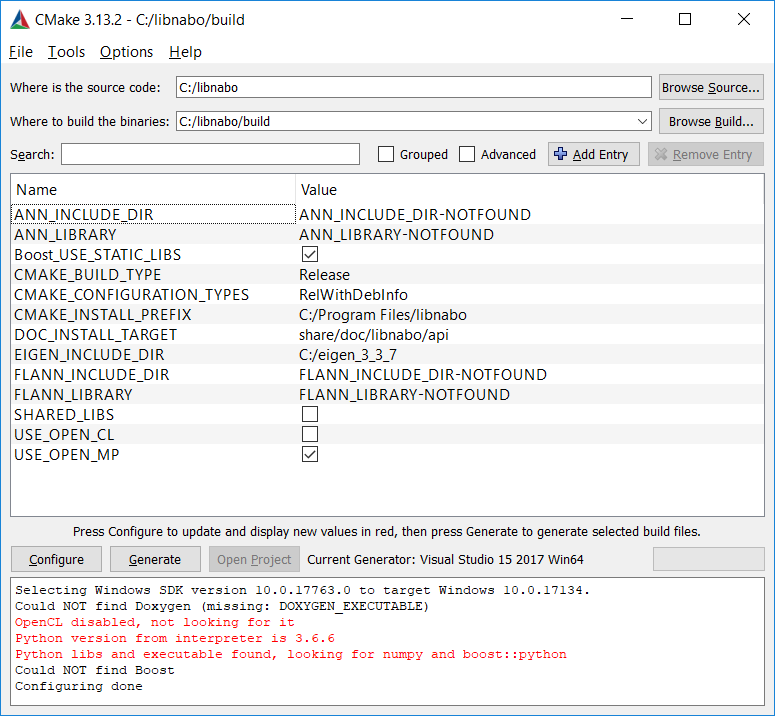
Click on the button Configure, then on Generate. Here is an example of what your CMake should look like:

-
Locate the Microsoft Visual Studio Solution file (libnabo.sln) in your build folder and open it. Visual Studio should open.
-
Build the solution: BUILD -> Build Solution
Alternatively, you can build the solution from the command line. In (your libnabo folder)/build:
$ msbuild /m:2 libnabo.sln(Note that the flag /m:X defines the number of cores msbuild will use while building the solution.)
Build libpointmatcher
-
Start CMake GUI, follow the same steps to configure the source and build folders for libpointmatcher, then click the Configure button.
-
Locate your eigen folder in the field EIGEN_INCLUDE_DIR
-
Add the following boolean variable and set it to
true: Boost_USE_STATIC_LIBS -
Add the following PATH variable and set it to (your Boost folder)/build: BOOST_ROOT
-
Add the following PATH variable and set it to (your libnabo source folder): NABO_INCLUDE_DIR
-
Add the following FILEPATH variable and set it to (your libnabo source folder)/build/RelWithDebInfo/nabo.lib: NABO_LIBRARY
-
Change the variable CMAKE_CONFIGURATION_TYPES to
RelWithDebInfo -
Click on the button Configure, then on Generate. Here is an example of what your CMake should look like:

-
In Visual Studio, build the solution: BUILD -> Build Solution
Alternatively, you can build the solution from the command line. In (your libpointmatcher folder)/build:
$ msbuild /m:2 libpointmatcher.sln(Note that the flag /m:X defines the number of cores msbuild will use while building the solution.)
Reporting Issues
Currently, we don't have a developer fully supporting compilation on Windows. If you can help refreshing this documentation, your help is more than welcome.
Before reporting new building issues, have a look in the current/past list of issues. Add as much details as you can since you will most probably receive answers from developers that cannot reproduce the problem on their side. Here are some of them:
- Your directory structure need to be well organized as mention in Issue #136.
- There might be some problems related to libnabo as mention in Issue #128.
Special Thanks
Special thanks to the following users in helping us with the Windows support:
- kwill for keeping the documentation up-to-date and investing time to make libpointmatcher compiling on Windows.
- braddodson for porting a version of libpointmacher in
C#with a limited set of features. The code can be found here: https://github.com/braddodson/pointmatcher.net